How crystals are grown. Artificial stones can be of different colors. How to grow crystals from salt at home: reasons for failure
You can find quite a lot of information about growing crystals at home. For example, from copper sulfate or table salt. I would like to offer a simple way to grow crystals that look like coral with a turquoise tint.
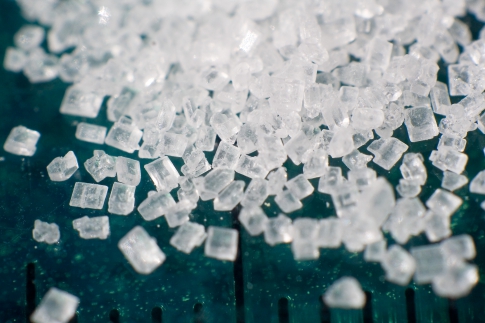
What we need: coarse salt, a pinch of copper sulfate and clean water without boiling. It is better to take filtered water, but not just from the tap.
Let's make a solution of table salt: pour water into a container and place it in a vessel with warm water (about 50°C - 60°C). Ideally, the water will not contain dissolved salts, that is, distilled, but in our case, you can use filtered tap water. Pour table salt into a jar and leave for 5-10 minutes, stirring before doing so. After some time, the jar of water will warm up and the salt will dissolve. It is important that the water temperature does not drop too much. Then add more salt and stir again. Repeat this operation until the salt stops dissolving and settles to the bottom of the jar. As a result, we will get a saturated salt solution. Pour the solution into a clean container, removing any undissolved salt from the bottom of the jar.
Pour approximately 50 ml of the resulting solution into a small container. and dissolve in this solution several crystals of copper sulfate, about half a teaspoon. Mix well.
Pour our prepared solution with vitriol into a jar until it turns green and place it in a cool place at about 14-16 degrees.

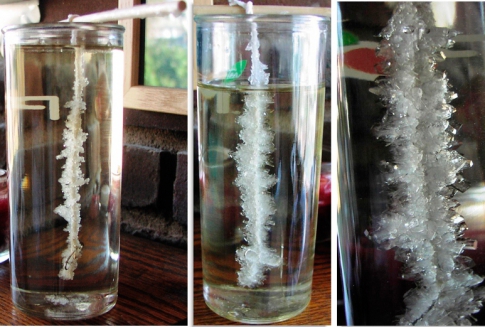
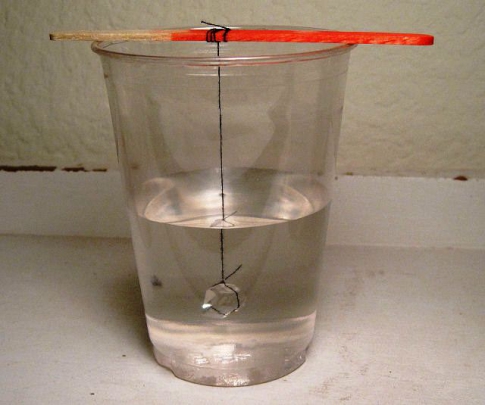
After the solution has cooled, you need to tie a salt crystal to a string. Place the other end on a stick and lower it into the solution to a depth of 10 - 15 mm. And again put it in a cool and dark place. After 2-3 days the crystal will grow. Then it will stop growing and the crystals will seem to climb up. After 5 days you will see the result. The crystal you see has been growing for about two weeks.


If you are interested in various experiments in the field of chemistry, then we suggest you try growing crystals at home as a hobby. It’s very interesting when different crystalline splendors grow out of nothing before your eyes, surprising you with the perfection of their shapes and colors. You just need to know that at home it takes quite a lot of time; the process of crystal formation does not always go quickly. But the result is that a slow speed means the formation of a large crystal, and vice versa: the faster the process, the smaller the size of the crystals formed.
There are various ways to grow a crystal at home. Among them: lowering the temperature of the substance, evaporation of excess liquid from the solution. In order not to be unfounded and to give practical advice on this, let’s start with the simplest substance, table salt. So, take a glass, pour water into it and place it in a pan with tap water heated to about 50-60 degrees. Pour salt into a glass and leave for 5 minutes until it dissolves. Think about how you will maintain the temperature of the water in the pan, because you need it to be warm at all times. You do this several times until the salt stops dissolving. For 100 grams of water, at least 35 grams of salt is required. As a result, you will receive a saturated solution, which must be poured into another transparent container, making sure that excess settled and undissolved salt does not get into it. Now find some more or less large crystal of salt, tie it by a thread and hang it like that. so that it does not touch the walls of the glass. And that's it, all you have to do is wait a few days. Until the crystal takes on the size you expect. By repeating the procedure again, you can increase the size of the crystals indefinitely.
This way you can grow crystals at home from any salts. You can get both blue and red crystals from it. In exactly the same way as in the above process, you get a saturated solution of this salt. Tap water alone will not work. You'll have to worry about getting it distilled somewhere, because you can't get a pure solution of copper sulfate otherwise.
And red crystals are obtained at home in the following way. You will need copper sulfate, blotting paper cut in the shape of a cross-section of a container and regular buttons. Growing crystals at home in this way begins by placing a little copper sulfate evenly on the bottom of a glass, pouring table salt on top, and covering this mixture with a circle of blotting paper, on which buttons or a steel plate are placed. Then, the entire contents must be filled to the top with a saturated solution of table salt, prepared in advance in the manner described above. Place this dish where it will not be moved for about one week. And then you will see beautiful red needle crystals grow.
Growing crystals at home is also possible in multi-layered colored form. This requires alum, from which saturated solutions are prepared in which various crystals are grown. And then they are alternately transferred from one solution to another. This is a more complex process, for which you need to have some knowledge in the field of chemical science. Firstly, alum dissolves at a fairly high temperature. Secondly, when stored in air, they can evaporate. Therefore, the results of growing such crystals may be negative. So you should start such experiments only if you are not afraid of disappointments.
Experiences like growing your own crystal will make you feel like a jack of all trades—you'll learn how to make beautiful home decorations, sweet candies, and help your kids learn basic chemistry.
Using Crystals
Such an idea how to grow a crystal- This is an excellent opportunity to study the chemical properties of different substances. If you have children at home, be sure to set them the task of growing a crystal at home - with your help, of course. The children will be interested in watching the progress of work, comprehending chemical science in such a fascinating way.
Some experiments will also help you obtain decorative details for decorating individual compositions - for example, salt crystals can become excellent decorative materials.
However, we must remember that many of the materials used are extremely toxic - they should not be touched with hands or inhaled. Such substances are unsuitable for use in everyday life - they can only be used for experiments.
Growing crystals can be chosen as a hobby, an exciting activity, because in fact the creator never knows what kind of crystal the end result will be.
Types of chemicals
At home, you can grow a crystal from a variety of substances. Some of them require special processing: you can work with them only under certain conditions - at a special temperature, lighting, etc. These include the following materials:
- Mohr's salt;
- blood salt;
- various alums;
- nickel sulfate;
- Ammonium nitrate.

If you are just starting to learn how to grow a crystal at home, it is better to hold off on using them.
However, many working mixtures, such as table salt, can be found in any home. It is recommended that beginners start working with them.
Salt
There is nothing easier than growing salt crystals at home!

To work with this product, you do not need to use any special accessories or set up a workplace with supernatural conditions.
Copper sulfate
Another simple option. Before growing a crystal from copper sulfate, the substance can be purchased at an amateur gardening store - it is sold as a fertilizer.

From the master classes presented below, you will understand that working with vitriol is as easy as growing a crystal from salt. The only difference is that the mixture is an active saturated salt substance, so it is not advisable to conduct experiments using running or any other water - only distilled water, which you can find in a pharmacy, is suitable.
Sugar
The only substance that can be eaten after the experience! Experiments with sugar are absolutely harmless, so you can safely teach children how to grow a crystal using his example.
The end result should be delicious sugar candies in the form of frosty crystals - an original replacement for cockerels on a stick.
Safety regulations
Despite the fact that novice chemists mainly use familiar solutions, such as salt or sugar, everyone must take certain precautions - instructions are presented below.
- Allocate special dishes for experiments that you will not eat from in the future. Neglecting this point can lead to serious food poisoning.
- Each substance must be stored in a separate, hermetically sealed package with a mandatory label for the contents on the bottle. Keep substances out of the reach of children and pets, in a cool and dark place.
- Wear protective clothing and gloves.
- Work with chemicals that release vapors into the air should only be carried out near powerful hoods.
- If acid gets on the skin, be sure to sprinkle the area with a weak alkali (water diluted with baking soda) and vice versa - alkaline solutions can be easily neutralized with an acid like citric acid.

Such skills are very useful when working with hazardous chemicals. Over time, you will bring the implementation of these instructions to automaticity and will not have to worry when you want to use dangerous mixtures instead of ordinary salt or soda to grow a crystal.
Salt crystals at home
After the theoretical tips, you can move on to the part where you will learn how to grow a crystal from salt. Prepare unlimited quantities of water - it is better to use distilled water (purified of any additives) so that the substance does not react with any impurities. However, regular running water will do.
In addition, you will need a small saucepan, a glass container (jar, glass), silk thread, and a pack of salt.
- Place a saucepan of water over medium heat. Heat the water, but do not bring it to a boil.
- Start adding salt to the water in small portions, stirring constantly. Each time, add a new handful after the previous one has completely dissolved.
- The preparation of the solution ends when the salt has completely stopped dissolving in water - this means you have prepared a concentrated mixture.
- Pour the concentrated composition into a transparent glass container and leave to settle for about a day.

- Free time is necessary for all the smallest, undissolved particles to settle to the bottom. In the photo you can see how the salt sediment turns out.

- Take a thread or string and tie it around a long thin stick that you can place on the neck of a glass container.
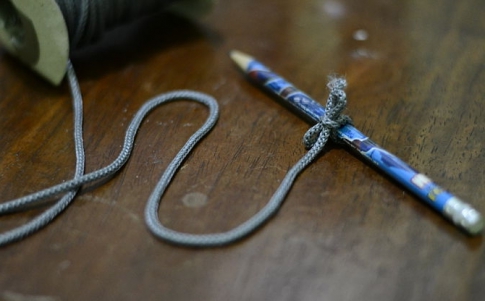
- The length of the string should be less than the height of the vessel, so cut off the excess.

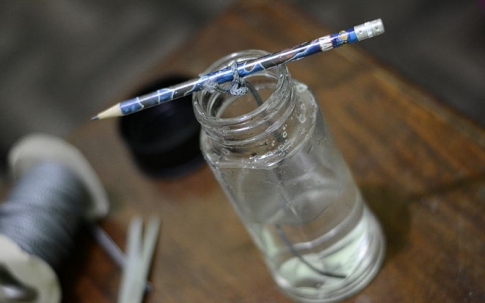
- Dip the thread into the water in a suspended state so that it does not touch the walls of the jar or the sediment at the bottom.
- Leave the experiment in this state for 1-3 weeks.

- Within a couple of days you will notice an increase in small crystals on the thread. The experiment in this case is interesting precisely by observing how much the crystal grows over a certain period of time.
- Instead of a regular thread, you can drop a large piece of salt suspended on a thread into a glass. In this case, the substance will grow around it.
You can either grow a crystal of a certain shape or an arbitrary one. To control the appearance of the substance, apply a thin layer of fat or Vaseline to one side of the crystal - you will see that there will be no growth here.
If desired, salt can be replaced with other substances - for example, using the same technology it is easy to prepare crystals from soda or copper sulfate.
How to grow a crystal from sugar?
If you have set yourself the goal of learning how to grow a crystal from sugar, you will be pleasantly surprised by the result - beautiful sweet candies that will delight children and pleasantly surprise adults during a tea party. An interesting option for using them is to stir tea with them. This gives you both a stir stick and a sugar sweetener.

- Prepare a concentrated sugar solution in the same way as in the experiment with salt - the sugar should completely stop dissolving in warm water. After this, pour the hot syrup into a transparent container.
- When the solution is ready, start preparing the base sticks. Tie one stick to the other crosswise so that the first is lowered into the vessel, and the other holds onto its neck.

- Dip the stick into the syrup - it should not touch the bottom.

- Leave the structure in a dry and warm place - you will notice within a day how crystals will begin to appear in the liquid.

- In about a week you will have finished sugar skewers. Bon appetit!

If you want your candy to be colored, add a little food coloring to each jar when pouring the hot syrup.
Such sweets can be a pleasant gift for loved ones during the holidays - such sweet sticks can be added to a gift for the New Year or Birthday.
To find out how to grow a crystal from copper sulfate, watch the following video.
Take it for yourself and tell your friends!
Read also on our website:
show more
Crystals can be grown from almost any substance. Crystals are obtained from proteins, iodine, and various metals. Not many people know that crystals can even be obtained from air by cooling it to a certain temperature. However, in ordinary media it is easiest to grow crystals from inorganic salts. In this material we will look at a method of growing crystals from copper sulfate, which is easy to find and purchase.
First of all, we suggest you familiarize yourself with the experiment process in the video
What do we need:
- copper sulfate;
- cup;
- hot water;
- plate;
- cardboard;
- colorless nail polish

The very first thing you need to do before you start growing a crystal is to make a seed, that is, a crystal that is subsequently lowered into the solution. This crystal will continue to grow. The size of the seed should be approximately the size of a pea.
To begin, take a glass and pour about half or a third of the glass of salt into it.

Next, pour hot water into our glass and mix everything thoroughly.

You can check whether you have added enough salt quite simply. To do this, you need to continue pouring salt until it stops dissolving.
After the salt has stopped dissolving and the solution has become as saturated as possible, it must be filtered, since salts usually contain impurities of various insoluble substances.

After the solution is filtered, you need to throw a small amount of small crystals to the bottom and leave this glass for a day so that large crystals form at the bottom.

After 24 hours, large crystals form at the bottom of the glass, the size of which is quite suitable for seeding.

We pour the solution into another glass, since you need to pick out the resulting mass of crystals. To do this, take a knife and pick out the fused mass of crystals at the bottom of the glass.

Pour the crystals into a plate and select the smoothest and largest crystal.


After we have chosen the largest and most “successful” crystal, it must be tied with a thread.

You also need to take a piece of cardboard and make a simple system, as shown in the figure below.


We hang the crystal in a glass with a solution. The cardboard system that the author uses and that we also offer provides the most efficient environment for growing crystals. Thanks to this system, no dust gets into the glass.


Crystal growth requires a lot of time and patience.
You can do an unusual experiment on growing crystals from salt with your children. This process is completely safe, since only salt and water are used and no additional reagents are required. Making such a craft with your own hands is quite simple, but you need to take into account several rules.
How to grow a crystal from salt - preparing tools and material
Before you start making crafts, prepare the necessary tools and determine a place for the container. The maturation process of the product will take some time, and the dishes cannot be moved or tilted.
- The main component for the formation of a crystal is salt. To obtain a smooth and transparent surface on your craft, use sea salt. It does not have impurities and small debris, like table salt.
- Crystal formation will occur in water. It must also be well cleaned of impurities. It is best to pour distilled water or boil the liquid and filter.
- The dishes for the experiment should not be metal. Since it can oxidize due to the action of the saline solution. The volume of the growing container does not matter and is limited only by the size of the desired crystal.
- Keep the container free of debris and debris. They will prevent salt from growing on the main crystal. Therefore, before the experiment, the dishes should be thoroughly washed and dried.
- As a base, you can use thread, fluffy wire, dried twigs or a large piece of salt.
- Additionally, you will need: a wooden spoon for stirring, a piece of gauze or bandage, paper towels, clear nail polish, a saucepan and a pencil.
How to grow a salt crystal with many facets
The initial stage of the experiment involves boiling the liquid. So help children warm up the liquid so they don't get burned.
- Prepare 120 ml. purified or distilled water. Pour it into a saucepan, place it on the stove and bring to a boil.

- Decide on the type of salt to form the crystal. So, with the help of ordinary table salt, the craft is formed within a few days, sea salt forms a crystal in 1-2 days, and with iodized salt you will have to wait a very long time for the product to grow.


- Prepare a saturated salt solution. You can tell if it’s ready by the grains that couldn’t dissolve in the water. To do this, add salt to warm water and stir the solution thoroughly. First add half a glass of salt. If the water is clear without grains, then add another quarter glass.


- Pour the solution into a dry and clean container. Make sure that the sediment remains in the pan, otherwise it will fall to the bottom of the jar and reduce the growth of the main crystal.


- At this stage, you can add dye to change the color of the crystal. But do not add too much of it, as in large quantities the product will make the craft brittle.


- Prepare the thread for the warp. It is desirable that it be thick with a rough surface. Tie it to a pencil or long skewer. Their size should be larger than the diameter of the container for growing the crystal and with edges for stability.

- Measure the required length of thread and cut it. Do not let it touch the bottom of the container.


- Place the pencil on top of the container. Make sure that the thread does not stick to the walls of the jar.

- Place the container with the saline solution on a flat surface. If you want to grow a crystal with large branches, then keep the liquid with the thread in a warm place. To form a crystal with smooth surfaces, place the container in the cold.


- Now all you have to do is watch the crystal grow.


How to grow one big crystal from salt
To obtain a large crystal with smooth edges after the experiment, it is necessary to use a slightly different technology.
- Prepare a concentrated salt solution as in the previous paragraph. Pour it into a container. But for this method of growing crafts, choose a flat and wide container. So the large crystal will not be able to connect with the rest, smaller parts.

- Leave the container with the solution for 2 days for small crystals to form. Then pour out the water and select the most suitable piece to grow.


- Tie a small crystal onto the fishing line. In this case, it is necessary to use a smooth thread or thin wire (fishing line) so that salt grains cannot attach to it.


- Prepare the saturated salt solution again. But this time, do not bring the water to a boil, but just warm it to room temperature.


- Place the crystal on a fishing line into the prepared container and pour in the saline solution in a thin stream. Secure the fishing line to the surface of the container with a pencil. In this case, the crystal should be located in the center of the container.

- Growing a crystal this way will take much longer than the previous option. Therefore, prepare a new salt solution every two weeks and be sure to filter it before pouring it into the container.
- When the crystals grow to the desired size, remove them from the liquid, dry them and be sure to cover them with a thick layer of colorless nail polish. It will prevent the water from evaporating, which will make the craft more durable for a long period.

Conducting an experiment on growing a crystal from salt at home is very simple and safe. But to obtain the desired effect, strictly follow the rules specified in the article and do not forget about finishing the product.
 What does Scarlett Johansson look like without makeup and photoshop?
 How was the wedding of Pavel Volya and Laysan Utyasheva
 Dakota Johnson: biography, personal life, family, husband, children - photo Dakota Johnson personal life after 50 shades
 Care for mature facial skin - folk remedies Let's talk about what skin cleansing products the modern cosmetic market offers
 How to save a family after your wife cheats?
 "My situation resembles an office romance
 Natalie Pushkina: biography, personal life, real name Current information about Natalie